Stable Diffusion on an AMD Ryzen 5 5600G
Published:
Updated:
Executing the Stable Diffusion text-to-image model on an AMD Ryzen 5 5600G integrated GPU (iGPU).
The Stable Diffusion implementations (either the original version or the one using the diffusers package) are curently expected to execute on nVidia GPUs (using CUDA). In this post, I wanted to see how efficiently it could execute on the integrated GPU (iGPU) of a recent AMD Ryzen CPU (AMD Ryzen 5 5600G).
| Implementation | Backend | Precision | Device | Duration |
|---|---|---|---|---|
| diffusers (simple) | CPU | simple | CPU | 7 min. |
| diffusers (simple) | HIP (ROCm) | simple | GPU | 2 min. 36 s |
| diffusers (simple) | HIP (ROCm) | mixed | GPU | 2 min. 28 s |
| diffusers (simple) | HIP (ROCm) | half | GPU | 2 min. 30 s |
| stable_diffusion.openvino | CPU plugin | simple | CPU | 3 min. 46 s |
System:
- AMD Ryzen 5 5600G with Radeon Graphics;
- 16 GiB RAM / 32 GiB of RAM[1];
- Debian testing;
- Linux kernel 5.18.16-1;
- Mesa 22.2.0-rc3~1.
TLDR
Runs on the Ryzen 5 5600G iGPU with enough RAM allocated to the iGPU using:
sudo apt install rocminfo rocm-smi rocm-device-libs
sudo setfacl -m u:$USER:rw /dev/kfd
python3 -m diffusers.venv
cd diffusers.venv
. bin/activate
pip install --upgrade diffusers transformers scipy ftfy
pip uninstall torch
pip install torch torchvision torchaudio --extra-index-url https://download.pytorch.org/whl/rocm5.1.1
huggingface-cli login
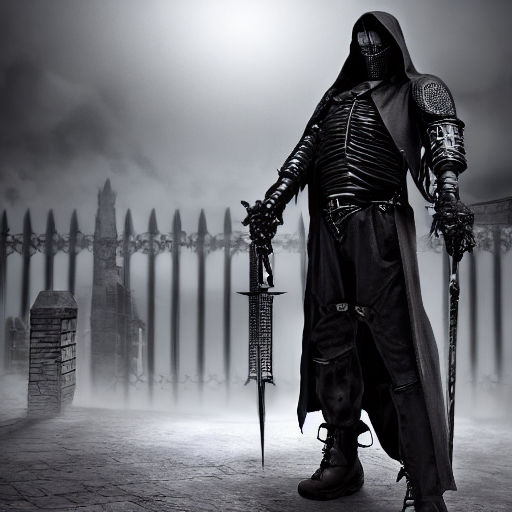
HSA_OVERRIDE_GFX_VERSION=9.0.0 DEVICE=cuda python3 generate.py "a gothic medieval cyberpunk knight, standing in front of a dark bridge, detailed" "test.jpg"
Table of content
Execution on the CPU
I am first trying to execute on the CPU.
Installation
Installation:
python3 -m diffusers.venv
cd diffusers.venv
. bin/activate
pip install --upgrade diffusers transformers scipy ftfy
huggingface-cli login
An account on Hugging Face is needed for the software to download the weights of the model.
First attempt
My initial code was:
from sys import argv
from torch import autocast
from diffusers import StableDiffusionPipeline

prompt = argv[1]
output_file = argv[2]

model_id = "CompVis/stable-diffusion-v1-4"
device = "cpu"

pipe = StableDiffusionPipeline.from_pretrained(
    torch_dtype=torch.float32,
    model_id, use_auth_token=True)
pipe = pipe.to(device)

with autocast(device):
    image = pipe(prompt, guidance_scale=7.5)["sample"][0]

image.save(output_file)
Executed as:
python3 generate.py "a gothic medieval cyberpunk knight, standing in front of a dark bridge, detailed" "test1.jpg"
This led to the following error:
RuntimeError: expected scalar type BFloat16 but found Float
Removing half-precision computations
This error is caused by autocast() which tries to automatically use half-precision (16 bit) floating points instead of single precision (32 bit) floating points for some computations for efficiency reasons. However, half-precision are not available on this CPU[2]. We need to disable the usage of half-precisions float by removing autocast().
from os import environ
from sys import argv
import torch
from diffusers import StableDiffusionPipeline

prompt = argv[1]
output_file = argv[2]

model_id = "CompVis/stable-diffusion-v1-4"
device = environ.get("DEVICE", "cpu")

pipe = StableDiffusionPipeline.from_pretrained(
    model_id,
    torch_dtype=torch.float32,
    use_auth_token=True)

pipe = pipe.to(device)
image = pipe(prompt, guidance_scale=7.5)["sample"][0]
image.save(output_file)
Executed as:
time python3 generate.py "a gothic medieval cyberpunk knight, standing in front of a dark bridge, detailed" "test1.jpg"
Rendering a single image (512×512, 50 iterations) takes 7 minutes on the CPU which is not that bad:
real	7m29,143s
user	35m40,751s
sys	5m54,596s


Interestingly, two of the four attempts with this query were censored by the Not Safe For Work (NSFW) filter included in Stable Diffusion (see appendix).
Using the iGPU (ROCm backend)
In this section, I am trying to use the ROCm / HIP backend of PyTorch in order to exploit the AMD iGPU. However, this GPU is not officially supported by ROCm.
We need to install some ROCm runtime and the ROCm-enabled version of PyTorch:
sudo apt install rocminfo rocm-smi rocm-device-libs
pip uninstall torch
pip install torch torchvision torchaudio --extra-index-url https://download.pytorch.org/whl/rocm5.1.1
The current user need to be in the render group in order to use the /dev/kfd device. As a quick workaround, we can just give access to this device for this user:
sudo setfacl -m u:$USER:rw /dev/kfd
Alternatively,
sudo chown $USER /dev/kfd
We can now get some information about our iGPU seen from ROCm:
rocminfo
Using the hip backend
Warning
The commands in this section are not correct. As explained below, you should use DEVICE=cuda when targeting AMD GPU using ROCm/HIP.
We can try to use the ROCm/HIP backend in order to exploit the AMD iGPU:
DEVICE=hip python3 generate.py "a gothic medieval cyberpunk knight, standing in front of a dark bridge, detailed" "test.jpg"
We get the following error:
Unable to find code object for all current devices!"
We can try to override the detected GPU version:
HSA_OVERRIDE_GFX_VERSION=9.0.0 DEVICE=hip python3 generate.py "a gothic medieval cyberpunk knight, standing in front of a dark bridge, detailed" "test.jpg"
However I still have another error:
NotImplementedError: Could not run 'aten::empty_strided' with arguments from the 'HIP' backend. This could be because the operator doesn't exist for this backend, or was omitted during the selective/custom build process (if using custom build). If you are a Facebook employee using PyTorch on mobile, please visit https://fburl.com/ptmfixes for possible resolutions.
Using the (fake) CUDA backend
The previous attempt failed because you are not supposed to specify the HIP backend (DEVICE=hip). HIP masquerades as CUDA. In order to use ROCm/HIP, you are expected to specify the CUDA backend (DEVICE=cuda).
Execution:
HSA_OVERRIDE_GFX_VERSION=9.0.0 DEVICE=cuda python3 generate.py "a gothic medieval cyberpunk knight, standing in front of a dark bridge, detailed" "test.jpg"
When doing this, the image generation fails with some out-of-memory error. Moreover, I get these kernel errors (and a GPU reset):
amdgpu: qcm fence wait loop timeout expired
amdgpu: The cp might be in an unrecoverable state due to an unsuccessful queues preemption
amdgpu: Failed to evict process queues
amdgpu: Failed to quiesce KFD
amdgpu 0000:04:00.0: amdgpu: GPU reset begin!
Allocating more VRAM to the iGPU
By adding 16 GiB of extra RAM (32 GiB in total) and dedicating 16 GiB of RAM for the GPU VRAM (in the BIOS), I managed to execute the computation of the GPU. Execution took 2 min 36 s[3]. This is significantly faster than the same code running on CPU.
Warning: 'qcm fence wait loop timeout expired' error and GPU reset
The program still generates the “qcm fence wait loop timeout expired” error and a GPU reset at the end of the program after the image has been generated succesfully (after/while releasing the GPU memory).
The GPU reset can be quite boring if you are running a desktop session because it freezes it. In many cases, you can recover from it by restarting the deskop session (in my case sudo systemctl restart lightdm from a Linux console would do the trick) but in some cases, the GPU (or the Linux driver) ends up in a weird state which can only be fixed by rebooting.
In many cases, the GPU reset does not happen anymore after a first one (but not always).
Note: update concerning the 'qcm fence wait loop timeout expired' error and GPU reset (2022-12-02)
The problem appears to have been fixed in some update (using Linux 6.0.10-1 and Mesa 22.2.4-1).


Mixed precision computations
Using mixed precision, I has a similar computation time (2 minutes 28 s).
with autocast("cuda"):
    image = pipe(text, width=width, height=height, guidance_scale=guidance, num_inference_steps=steps)["sample"][0]
Half precision model
Using half precision, I had a similar computation time as well (2 min. 30 s) and a lower VRAM memory usage (38 % of 16 GiB).
pipe = StableDiffusionPipeline.from_pretrained(
    model_id,
    revision="fp16", torch_dtype=torch.float16,
    use_auth_token=True)

### ...

with autocast("cuda"):
    image = pipe(text, width=width, height=height, guidance_scale=guidance, num_inference_steps=steps)["sample"][0]
Bonus, extra examples


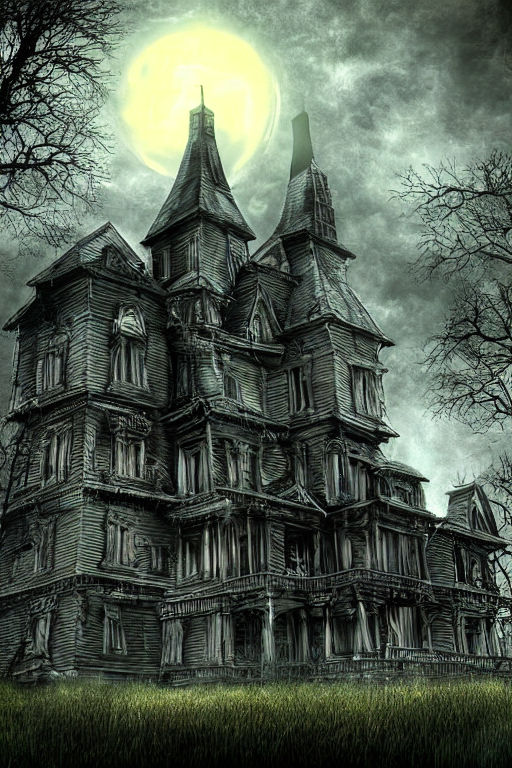

I really like this one.
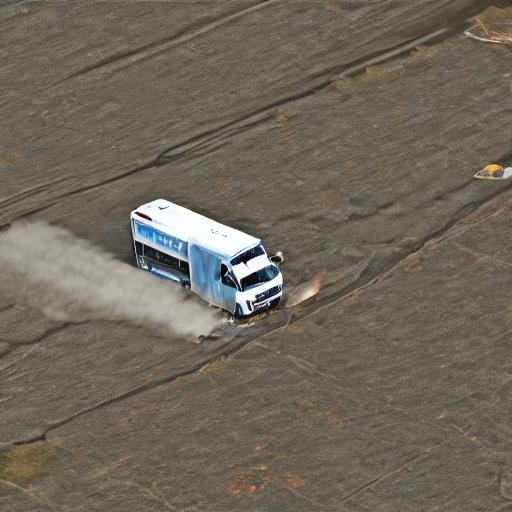
Bonus, botched output
Here is what I got in the first try when I was passing the output filename (testN.jpg) instead of the actual input to the neural network which gave completely random output. 🤪

Appendix, NSFW filter
The NFSW filter is run after the main processing: an additional neural network is run on the output image which is used to detect NSFW images. If such an image is detected, it is replaced by a completely black image by the model (see the StableDiffusionSafetyChecker class):
pooled_output = self.vision_model(clip_input)[1]  # pooled_output
image_embeds = self.visual_projection(pooled_output)

special_cos_dist = cosine_distance(image_embeds, self.special_care_embeds).cpu().numpy()
cos_dist = cosine_distance(image_embeds, self.concept_embeds).cpu().numpy()

...

has_nsfw_concepts = [len(res["bad_concepts"]) > 0 for res in result]

for idx, has_nsfw_concept in enumerate(has_nsfw_concepts):
    if has_nsfw_concept:
        images[idx] = np.zeros(images[idx].shape)  # black image
...
return images, has_nsfw_concepts
We can disable the NSFW filter by overriding pipe.safety_checker to a no-op.
Appendix, parameters
We can pass the parameters to the pipe-() call:
prompt: Union[str, List[str]]height: Optional[int] = 512width: Optional[int] = 512num_inference_steps: Optional[int] = 50guidance_scale: Optional[float] = 7.5, discussed in "Stable Diffusion with 🧨 Diffusers"eta: Optional[float] = 0.0
References
Stable Diffusion
- High-Resolution Image Synthesis with Latent Diffusion Models (Stable Diffusion Paper)
- Stable Diffusion Public Release
- Stable Diffusion v1-4 Model Card
- Stable Diffusion GitHub repository
- Stable Diffusion prompting cheatsheet
- Stable Diffusion on AMD RDNA™ 3 Architecture
- Running Stable Diffusion on Windows with an AMD GPU
Technical details
- Implementation of Text-To-Image generation using Stable Diffusion on Intel CPU
- Run Stable Diffusion on your M1 Mac’s GPU
- Running Stable Diffusion on your GPU with less than 10Gb of VRAM on Windows
Online demos
- Stable Diffusion Public Demonstration
- Crayion, online DALL-E mini
Stable Diffusion artwork
Articles about diffusers
ROCm
- ROCm Hardware and Software Support Reference Guide
- PyTorch for AMD ROCm™ Platform now available as Python package
- Issue: Getting “hipErrorNoBinaryForGPU: Unable to find code object for all current devices!” when trying to run PyTorch
- GitHub Issue: ROCm 5.xx ever planning to include gfx90c GPUs?
Backlinks
The two CPU executions worked fine with 16 GiB of RAM. In order to execute the ROCm, I had to add 16 GiB of RAM and allocate 16 GiB for the GPU VRAM. The original 16 GiB of RAM would probably have been enough by allocating 8GiB of GPU VRAM. ↩︎
FP16 is supported on some CPUs. For the Intel architecture, this is the AVX-512_FP16 extension. ↩︎
radeontopreports 48% of GPU usage. Allocating 8GiB of VRAM from the 16 GiB of RAM might have been enough. ↩︎